# TProxy Transparent Proxy (IPv4 and IPv6) Configuration Tutorial
This configuration is based on the [New V2Ray Plain English Guide for TProxy Transparent Proxy](https://guide.v2fly.org/app/tproxy.html), the [Transparent Proxy (TProxy) Configuration Tutorial](https://xtls.github.io/document/level-2/tproxy.html#%E5%BC%80%E5%A7%8B%E4%B9%8B%E5%89%8D), and [Bypassing Xray Traffic via GID](https://xtls.github.io/document/level-2/iptables_gid.html). It adds support for IPv6 transparent proxying and utilizes the VLESS-TCP-XTLS-RPRX-Vision scheme to counter blocking (version 1.7.2 or later is recommended).
The configuration of Xray itself is not the main focus of this article. Users should modify it according to their actual situation. For specific details, please refer to the [official document examples](https://github.com/XTLS/Xray-examples) or other excellent examples such as [@chika0801](https://github.com/chika0801/Xray-examples) and [@lxhao61](https://github.com/lxhao61/integrated-examples).
::: warning Note
If you use other configurations, you need to pay special attention to the part where the `tag` is `proxy` in the `outbound` section of the client configuration. Other parts remain unchanged.
The server configuration must also be changed accordingly.
:::
This configuration aims to solve the problem where websites that default to IPv6 connections, such as Netflix, cannot be proxied through a side router (gateway), or to satisfy the need for IPv6 proxying.
The network structure in this article is a Single-Arm Router (Side Router).
All configurations in this article have been successfully tested in an Arch Linux (Kernel: 6.0.10) environment. The logic is the same for other environments.
Note that you need to install the corresponding programs: `# sudo apt install iptables ip6tables` or `# sudo apt install nftables`.
If the Xray program is not installed on the side router, you can manually download the corresponding Xray program, such as [Xray-linux-64.zip](https://github.com/XTLS/Xray-core/releases/download/v1.7.0/Xray-linux-64.zip), then copy the [install-release.sh](https://github.com/XTLS/Xray-install/blob/main/install-release.sh) file to the side router, grant executable permission `# chmod 700 install-release.sh`, and then use `# ./install-release.sh --local Xray-linux-64.zip` to perform a local installation according to the prompts.
## Xray Configuration
### Client Configuration
```json
{
"log": {
"loglevel": "warning"
},
"inbounds": [
{
"tag": "all-in",
"port": 12345,
"protocol": "tunnel",
"settings": {
"allowedNetwork": "tcp,udp",
"followRedirect": true
},
"sniffing": {
"enabled": true,
"destOverride": ["http", "tls", "quic"]
},
"streamSettings": {
"sockopt": {
"tproxy": "tproxy"
}
}
},
{
"port": 10808,
"protocol": "socks",
"sniffing": {
"enabled": true,
"destOverride": ["http", "tls", "quic"]
},
"settings": {
"auth": "noauth",
"udp": true
}
}
],
"outbounds": [
{
// This is the default outbound. If the routing module does not match any rules,
// it defaults to this "proxy" exit. If you prefer direct connection for domestic traffic as priority,
// please move the "direct" outbound below to the first position in outbounds. Ignore if you don't understand.
"tag": "proxy",
"protocol": "vless",
"settings": {
"address": "yourdomain.domain", // Change to your own domain. Direct IPv4 or IPv6 address is also acceptable.
"port": 443,
"id": "uuid", // Fill in UUID. Can be generated by typing 'xray uuid' in terminal; Arbitrary strings are also supported (https://xtls.github.io/en/config/inbounds/vless.html#userobject)
"encryption": "none",
"flow": "xtls-rprx-vision"
},
"streamSettings": {
"sockopt": {
"mark": 255
},
"network": "tcp",
"security": "tls", // Note: must be tls when using xtls-rprx-vision flow
"tlsSettings": {
// Note: must be tlsSettings when using xtls-rprx-vision flow
"allowInsecure": false,
"serverName": "yourdomain.domain", // Change to your own domain
"fingerprint": "chrome" // Recommended to check Release notes for this setting: https://github.com/XTLS/Xray-core/releases/tag/v1.7.3
}
}
},
{
"tag": "direct",
"protocol": "freedom",
"settings": {
"domainStrategy": "UseIP"
},
"streamSettings": {
"sockopt": {
"mark": 255
}
}
},
{
"tag": "block",
"protocol": "blackhole",
"settings": {
"response": {
"type": "http"
}
}
},
{
"tag": "dns-out",
"protocol": "dns",
"streamSettings": {
"sockopt": {
"mark": 255
}
}
}
],
"dns": {
"hosts": {
"domain:googleapis.cn": "googleapis.com",
"dns.google": "8.8.8.8",
"Your_VPS_Domain": "Your_VPS_IP" // If 'address' in outbound proxy is a domain: fill VPS IPv4 if you want proxy via IPv4, fill VPS IPv6 if via IPv6; If 'address' is an IP, skip this line.
},
"servers": [
"https://1.1.1.1/dns-query",
{
"address": "119.29.29.29",
"domains": ["geosite:cn"],
"expectIPs": ["geoip:cn"]
},
"https://dns.google/dns-query",
"223.5.5.5",
"localhost"
]
},
"routing": {
"domainMatcher": "mph",
"domainStrategy": "IPIfNonMatch",
"rules": [
{
"domain": ["geosite:category-ads-all"],
"outboundTag": "block"
},
{
"inboundTag": ["all-in"],
"port": 123,
"network": "udp",
"outboundTag": "direct"
},
{
"inboundTag": ["all-in"],
"port": 53,
"network": "udp",
"outboundTag": "dns-out"
},
{
"ip": ["119.29.29.29", "223.5.5.5"],
"outboundTag": "direct"
},
{
"protocol": ["bittorrent"],
"outboundTag": "direct"
},
{
"ip": ["geoip:private", "geoip:cn"], // Can add VPS IP here to avoid proxying SSH connections
"outboundTag": "direct"
},
{
"domain": ["geosite:cn"],
"outboundTag": "direct"
},
{
"ip": ["1.1.1.1", "8.8.8.8"],
"outboundTag": "proxy"
},
{
"domain": [
"geosite:geolocation-!cn",
"domain:googleapis.cn",
"dns.google"
],
"outboundTag": "proxy"
}
]
}
}
```
### Server Configuration
```json
{
"log": {
"loglevel": "warning"
},
"routing": {
"domainStrategy": "IPIfNonMatch",
"rules": [
{
// Block CN IP to improve security, or you can route CN traffic into Warp, see https://xtls.github.io/en/document/level-2/warp.html
"ip": ["geoip:cn"],
"outboundTag": "block"
}
]
},
"inbounds": [
{
"port": 443,
"protocol": "vless",
"settings": {
"users": [
{
"id": "uuid", // Same as client
"flow": "xtls-rprx-vision"
}
],
"decryption": "none",
"fallbacks": [
{
"dest": 8080 // Fallback, requires web server cooperation, see the plain English guide. Optional.
}
]
},
"streamSettings": {
"network": "tcp",
"security": "tls",
"tlsSettings": {
"certificates": [
{
"certificateFile": "/etc/ssl/private/fullchain.crt",
"keyFile": "/etc/ssl/private/crt.key" // Refer to the Beginner's Guide to fill in the path of the generated fullchain.crt and cert.key here (https://xtls.github.io/en/document/level-0/ch06-certificates.html#_6-4-official-certificate-issuance)
}
]
}
},
"sniffing": {
"enabled": true,
"destOverride": ["http", "tls"]
}
}
],
"outbounds": [
{
"protocol": "freedom",
"tag": "direct"
},
{
"protocol": "blackhole",
"tag": "block"
}
]
}
```
## Netfilter Configuration
### First, Set Policy Routing
```sh
# Set policy routing v4
ip rule add fwmark 1 table 100
ip route add local 0.0.0.0/0 dev lo table 100
# Set policy routing v6
ip -6 rule add fwmark 1 table 106
ip -6 route add local ::/0 dev lo table 106
# Direct connection goes out from the main router
ip route add default via 192.168.31.1 # Write main router IPv4. Not needed if using Method 1 for LAN devices.
ip -6 route add default via fd00:6868:6868::1 # Write main router IPv6. Not needed if using Method 1 for LAN devices.
```
::: tip Usage
Copy the commands directly to the side router terminal and execute them.
:::
::: tip About "Direct connection goes out from the main router"
Run the command `ip route show` on the side router.
If you use **Method 1** below, the `default via` should be the main router's IP, and no change is needed.
If you use **Method 2** below, the `default via` would be the side router's IP. In this case, DNS resolution for direct connections will loop back, causing direct websites to be inaccessible, so it must be specified as the main router's IP.
:::
If you specified the default gateway as the side router on the main router (i.e., "LAN Device Internet Setup Method 2" below), then you need to set the above `# Direct connection goes out from the main router`. besides setting it via `iproute2` command line, you can also set a static IP via `dhcpcd` or `systemctl-network`. Here we take `dhcpcd` as an example. Edit the `/etc/dhcpcd.conf` file and add the following configuration at the bottom. Modify the specific IP according to your actual situation. The `interface` can be viewed via `# ip link show` to see the network port or wireless device to be configured.
```ini
interface enp0s25
static ip_address=192.168.31.100/24
static ip6_address=fd00:6868:6868::8888/64
static routers=192.168.31.1
static domain_name_servers=192.168.31.1 fd00:6868:6868::1
```
By setting the IP and gateway via static IP this way, there is no need to set `# Direct connection goes out from the main router` every time you boot.
::: warning Note
Choose **either** the following nftables configuration **or** iptables configuration. Do not use both simultaneously.
Write the selected configuration to a file, make it executable, and then run that file as root.
:::
::: code-group
```bash [iptables.rules]
# Proxy LAN devices v4
iptables -t mangle -N XRAY
iptables -t mangle -A XRAY -d 127.0.0.1/32 -j RETURN
iptables -t mangle -A XRAY -d 224.0.0.0/4 -j RETURN
iptables -t mangle -A XRAY -d 255.255.255.255/32 -j RETURN
iptables -t mangle -A XRAY -d 192.168.0.0/16 -p tcp -j RETURN
iptables -t mangle -A XRAY -d 192.168.0.0/16 -p udp ! --dport 53 -j RETURN
iptables -t mangle -A XRAY -j RETURN -m mark --mark 0xff
iptables -t mangle -A XRAY -p udp -j TPROXY --on-ip 127.0.0.1 --on-port 12345 --tproxy-mark 1
iptables -t mangle -A XRAY -p tcp -j TPROXY --on-ip 127.0.0.1 --on-port 12345 --tproxy-mark 1
iptables -t mangle -A PREROUTING -j XRAY
# Proxy LAN devices v6
ip6tables -t mangle -N XRAY6
ip6tables -t mangle -A XRAY6 -d ::1/128 -j RETURN
ip6tables -t mangle -A XRAY6 -d fe80::/10 -j RETURN
ip6tables -t mangle -A XRAY6 -d fd00::/8 -p tcp -j RETURN
ip6tables -t mangle -A XRAY6 -d fd00::/8 -p udp ! --dport 53 -j RETURN
ip6tables -t mangle -A XRAY6 -j RETURN -m mark --mark 0xff
ip6tables -t mangle -A XRAY6 -p udp -j TPROXY --on-ip ::1 --on-port 12345 --tproxy-mark 1
ip6tables -t mangle -A XRAY6 -p tcp -j TPROXY --on-ip ::1 --on-port 12345 --tproxy-mark 1
ip6tables -t mangle -A PREROUTING -j XRAY6
# Proxy Gateway Itself v4
iptables -t mangle -N XRAY_MASK
iptables -t mangle -A XRAY_MASK -d 224.0.0.0/4 -j RETURN
iptables -t mangle -A XRAY_MASK -d 255.255.255.255/32 -j RETURN
iptables -t mangle -A XRAY_MASK -d 192.168.0.0/16 -p tcp -j RETURN
iptables -t mangle -A XRAY_MASK -d 192.168.0.0/16 -p udp ! --dport 53 -j RETURN
iptables -t mangle -A XRAY_MASK -j RETURN -m mark --mark 0xff
iptables -t mangle -A XRAY_MASK -p udp -j MARK --set-mark 1
iptables -t mangle -A XRAY_MASK -p tcp -j MARK --set-mark 1
iptables -t mangle -A OUTPUT -j XRAY_MASK
# Proxy Gateway Itself v6
ip6tables -t mangle -N XRAY6_MASK
ip6tables -t mangle -A XRAY6_MASK -d fe80::/10 -j RETURN
ip6tables -t mangle -A XRAY6_MASK -d fd00::/8 -p tcp -j RETURN
ip6tables -t mangle -A XRAY6_MASK -d fd00::/8 -p udp ! --dport 53 -j RETURN
ip6tables -t mangle -A XRAY6_MASK -j RETURN -m mark --mark 0xff
ip6tables -t mangle -A XRAY6_MASK -p udp -j MARK --set-mark 1
ip6tables -t mangle -A XRAY6_MASK -p tcp -j MARK --set-mark 1
ip6tables -t mangle -A OUTPUT -j XRAY6_MASK
# Create DIVERT rule to avoid packet re-traversal through TPROXY for existing connections, theoretical performance boost v4
iptables -t mangle -N DIVERT
iptables -t mangle -A DIVERT -j MARK --set-mark 1
iptables -t mangle -A DIVERT -j ACCEPT
iptables -t mangle -I PREROUTING -p tcp -m socket -j DIVERT
# Create DIVERT rule to avoid packet re-traversal through TPROXY for existing connections, theoretical performance boost v6
ip6tables -t mangle -N DIVERT
ip6tables -t mangle -A DIVERT -j MARK --set-mark 1
ip6tables -t mangle -A DIVERT -j ACCEPT
ip6tables -t mangle -I PREROUTING -p tcp -m socket -j DIVERT
```
```bash [nftables.rules]
#!/usr/sbin/nft -f
flush ruleset
table inet xray {
chain prerouting {
type filter hook prerouting priority filter; policy accept;
ip daddr { 127.0.0.0/8, 224.0.0.0/4, 255.255.255.255 } return
meta l4proto tcp ip daddr 192.168.0.0/16 return
ip daddr 192.168.0.0/16 udp dport != 53 return
ip6 daddr { ::1, fe80::/10 } return
meta l4proto tcp ip6 daddr fd00::/8 return
ip6 daddr fd00::/8 udp dport != 53 return
meta mark 0x000000ff return
meta l4proto { tcp, udp } meta mark set 0x00000001 tproxy ip to 127.0.0.1:12345 accept
meta l4proto { tcp, udp } meta mark set 0x00000001 tproxy ip6 to [::1]:12345 accept
}
chain output {
type route hook output priority filter; policy accept;
ip daddr { 127.0.0.0/8, 224.0.0.0/4, 255.255.255.255 } return
meta l4proto tcp ip daddr 192.168.0.0/16 return
ip daddr 192.168.0.0/16 udp dport != 53 return
ip6 daddr { ::1, fe80::/10 } return
meta l4proto tcp ip6 daddr fd00::/8 return
ip6 daddr fd00::/8 udp dport != 53 return
meta mark 0x000000ff return
meta l4proto { tcp, udp } meta mark set 0x00000001 accept
}
chain divert {
type filter hook prerouting priority mangle; policy accept;
meta l4proto tcp socket transparent 1 meta mark set 0x00000001 accept
}
}
```
:::
Where gateway addresses `192.168.0.0/16`, `fd00::/8`, etc., can be [obtained](https://xtls.github.io/document/level-2/iptables_gid.html#_4-%E8%AE%BE%E7%BD%AE-iptables-%E8%A7%84%E5%88%99) by `ip address | grep -w inet | awk '{print $2}'` and `ip address | grep -w inet6 | awk '{print $2}'`.
Or check in Windows Network Settings.
Or check in the Router's "Internet Settings".
If the prefixes `192.168`, `fd00:` are the same, you don't need to change them. If they are different, such as `fc00:`, `fe00:`, etc., change them to the corresponding values. The notation (like `fc00::/7`, `fe00::/9`) can be found via Google search.
### Auto-run Netfilter Configuration on Boot
First, confirm that you have run the corresponding Netfilter commands above and successfully tested the transparent proxy configuration to ensure the output files are correct.
- **If using `iptables`**
First, save the configuration to `iptables.rulesv4` and `iptables.rulesv6` with `# iptables-save > /root/iptables.rulesv4` and `# ip6tables-save > /root/iptables.rulesv6`.
- **If using `nftables`**
First, save the configuration to `nftables.rulesv46` with `# nft list ruleset > /root/nftables.rulesv46`.
Then create `tproxyrules.service` under `/etc/systemd/system/`, write the corresponding content for the chosen option, and finally run `systemctl enable tproxyrules`.
::: code-group
```ini [iptables tproxyrules.service]
[Unit]
Description=Tproxy rules
[Service]
Type=oneshot
RemainAfterExit=yes
ExecStartPre=/bin/sh -c 'until ping -c1 192.168.31.1; do sleep 1; done;'
ExecStart=/sbin/ip rule add fwmark 1 table 100 ; \
/sbin/ip -6 rule add fwmark 1 table 106 ; \
/sbin/ip route add local 0.0.0.0/0 dev lo table 100 ; \
/sbin/ip -6 route add local ::/0 dev lo table 106 ; \
/sbin/ip route add default via 192.168.31.1 ; \
/sbin/ip -6 route add default via fd00:6868:6868::1 ; \
/sbin/iptables-restore /root/iptables.rulesv4 ; \
/sbin/ip6tables-restore /root/iptables.rulesv6
ExecStop=/sbin/ip rule del fwmark 1 table 100 ; \
/sbin/ip -6 rule del fwmark 1 table 106 ; \
/sbin/ip route del local 0.0.0.0/0 dev lo table 100 ; \
/sbin/ip -6 route del local ::/0 dev lo table 106 ; \
/sbin/ip route del default via 192.168.31.1 ; \
/sbin/ip -6 route del default via fd00:6868:6868::1 ; \
/sbin/iptables -t mangle -F ; \
/sbin/ip6tables -t mangle -F
[Install]
WantedBy=multi-user.target
```
```ini [nftables tproxyrules.service]
[Unit]
Description=Tproxy rules
[Service]
Type=oneshot
RemainAfterExit=yes
ExecStartPre=/bin/sh -c 'until ping -c1 192.168.31.1; do sleep 1; done;'
ExecStart=/sbin/ip rule add fwmark 1 table 100 ; \
/sbin/ip -6 rule add fwmark 1 table 106 ; \
/sbin/ip route add local 0.0.0.0/0 dev lo table 100 ; \
/sbin/ip -6 route add local ::/0 dev lo table 106 ; \
/sbin/ip route add default via 192.168.31.1 ; \
/sbin/ip -6 route add default via fd00:6868:6868::1 ; \
/sbin/nft -f /root/nftables.rulesv46 ;
ExecStop=/sbin/ip rule del fwmark 1 table 100 ; \
/sbin/ip -6 rule del fwmark 1 table 106 ; \
/sbin/ip route del local 0.0.0.0/0 dev lo table 100 ; \
/sbin/ip -6 route del local ::/0 dev lo table 106 ; \
/sbin/ip route del default via 192.168.31.1 ; \
/sbin/ip -6 route del default via fd00:6868:6868::1 ; \
/sbin/nft flush ruleset
[Install]
WantedBy=multi-user.target
```
:::
::: tip tproxyrules.service
Note the Main Router IP address, modify it according to reality.
The command `ExecStartPre=/bin/sh -c 'until ping -c1 192.168.31.1; do sleep 1; done;'` ensures that the command is executed only after obtaining an IP address, otherwise weird errors may occur. The IP address is the main router address, modify it according to reality.
:::
::: warning Note
If you have set a static IP and gateway via dhcpcd, etc., the related `ip route add/del` settings above should be removed.
:::
## LAN Device Internet Setup
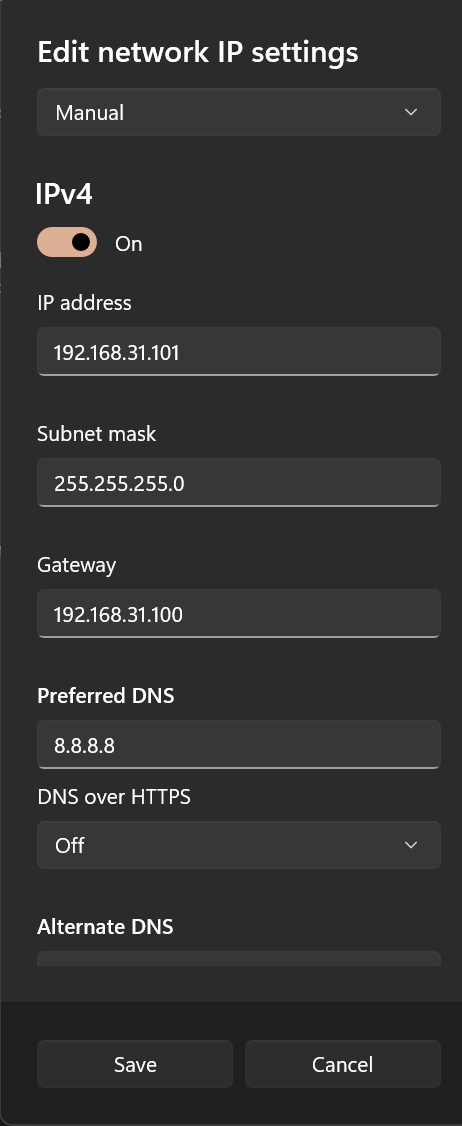
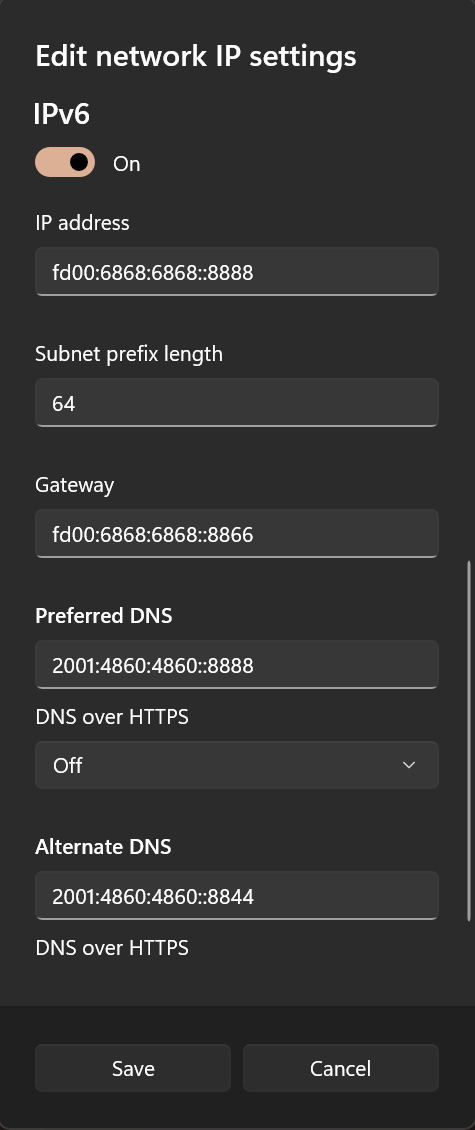
Assuming the IPv4 and IPv6 addresses of the side router are `192.168.31.100` and `fd00:6868:6868::8866` respectively. The IP addresses of the side router can be obtained by the command `ip add`.
### Method 1
There are two ways for LAN devices to access the Internet. The first is to configure a static IP on the device and point the gateway to the side router IP. Note that most mobile phones only support manual configuration of IPv4 gateways and do not support manual configuration of IPv6 gateways unless rooted and configured accordingly.
Taking a Windows device as an example, you can first enable DHCP to record the automatically assigned IP for reference, and then write the static configuration manually.
::: tip DNS Settings
This configuration hijacks DNS traffic, so DNS can be written arbitrarily.
It is recommended to set it to the side router IP to prevent DNS leaks.
:::
 ### Method 2
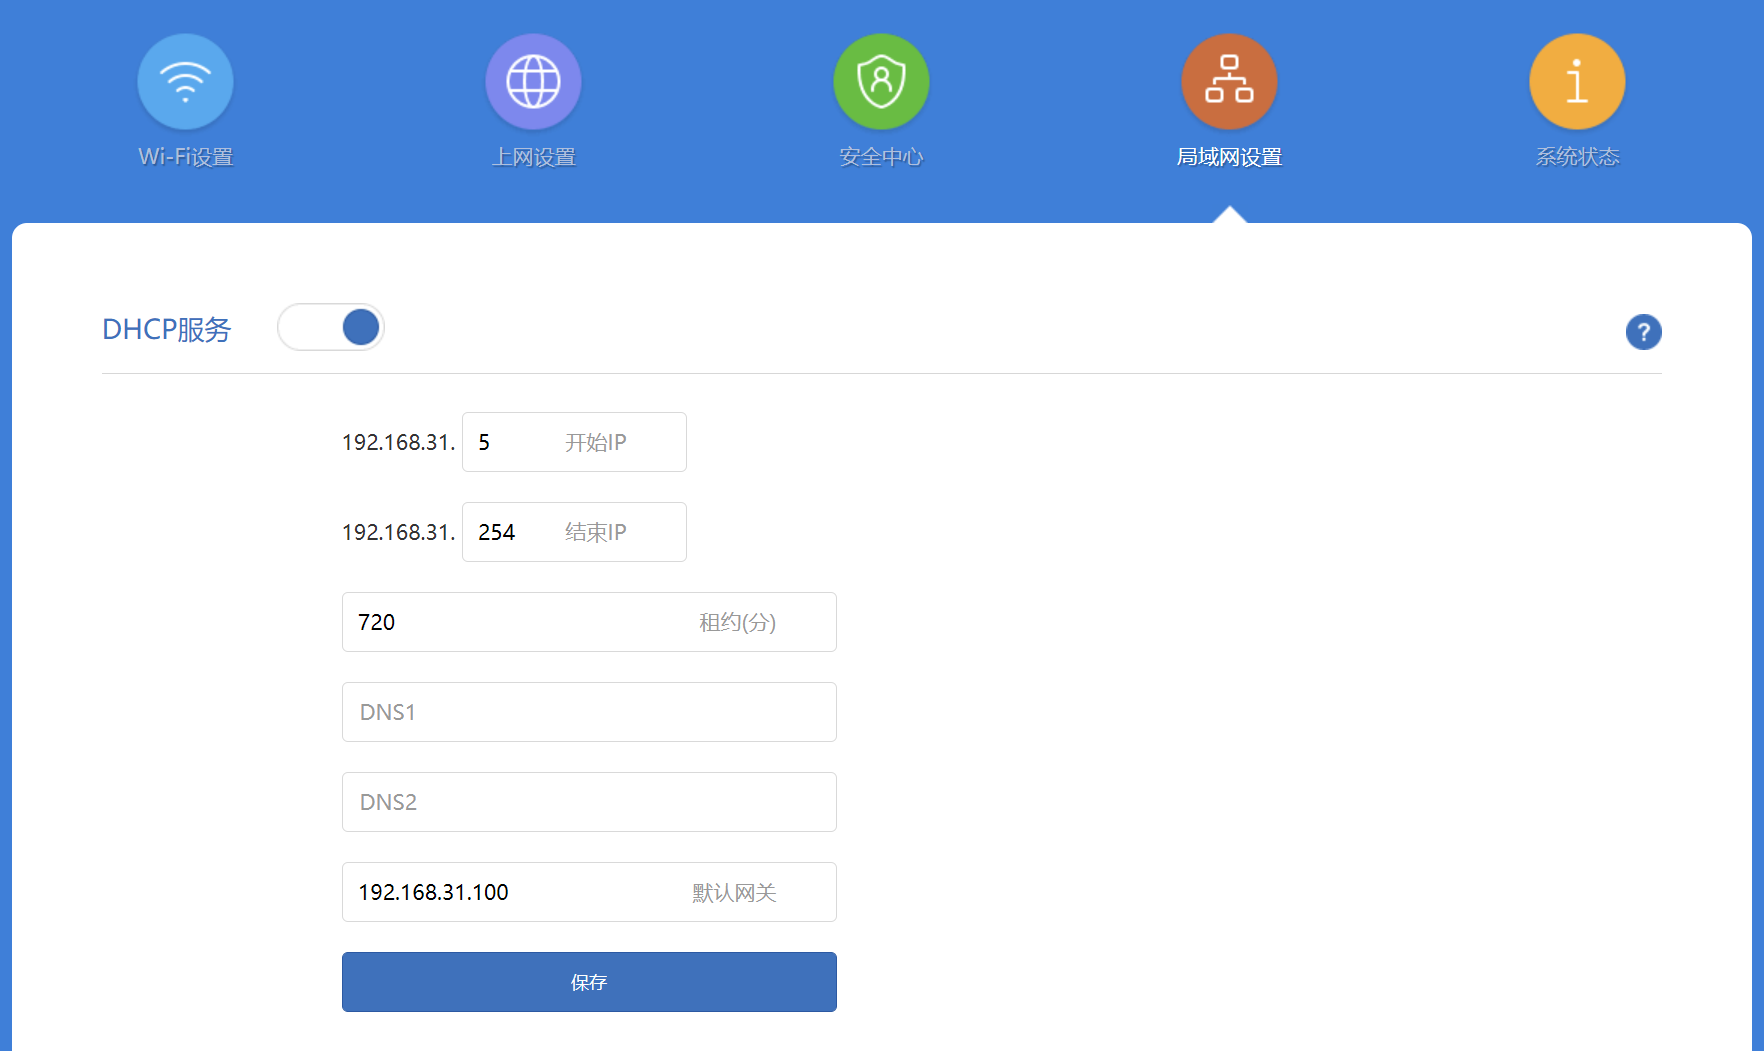
The second way for LAN devices to access the Internet is to configure the gateway on the router. With this method, devices connected to this router can access the scientific internet (bypass firewall) without any configuration. However, note that some routers do not support IPv6 gateway configuration. Devices requiring IPv6 still need to manually configure IPv6-related settings on the specific device (refer to Method 1).
### Method 2
The second way for LAN devices to access the Internet is to configure the gateway on the router. With this method, devices connected to this router can access the scientific internet (bypass firewall) without any configuration. However, note that some routers do not support IPv6 gateway configuration. Devices requiring IPv6 still need to manually configure IPv6-related settings on the specific device (refer to Method 1).
 ## Finally
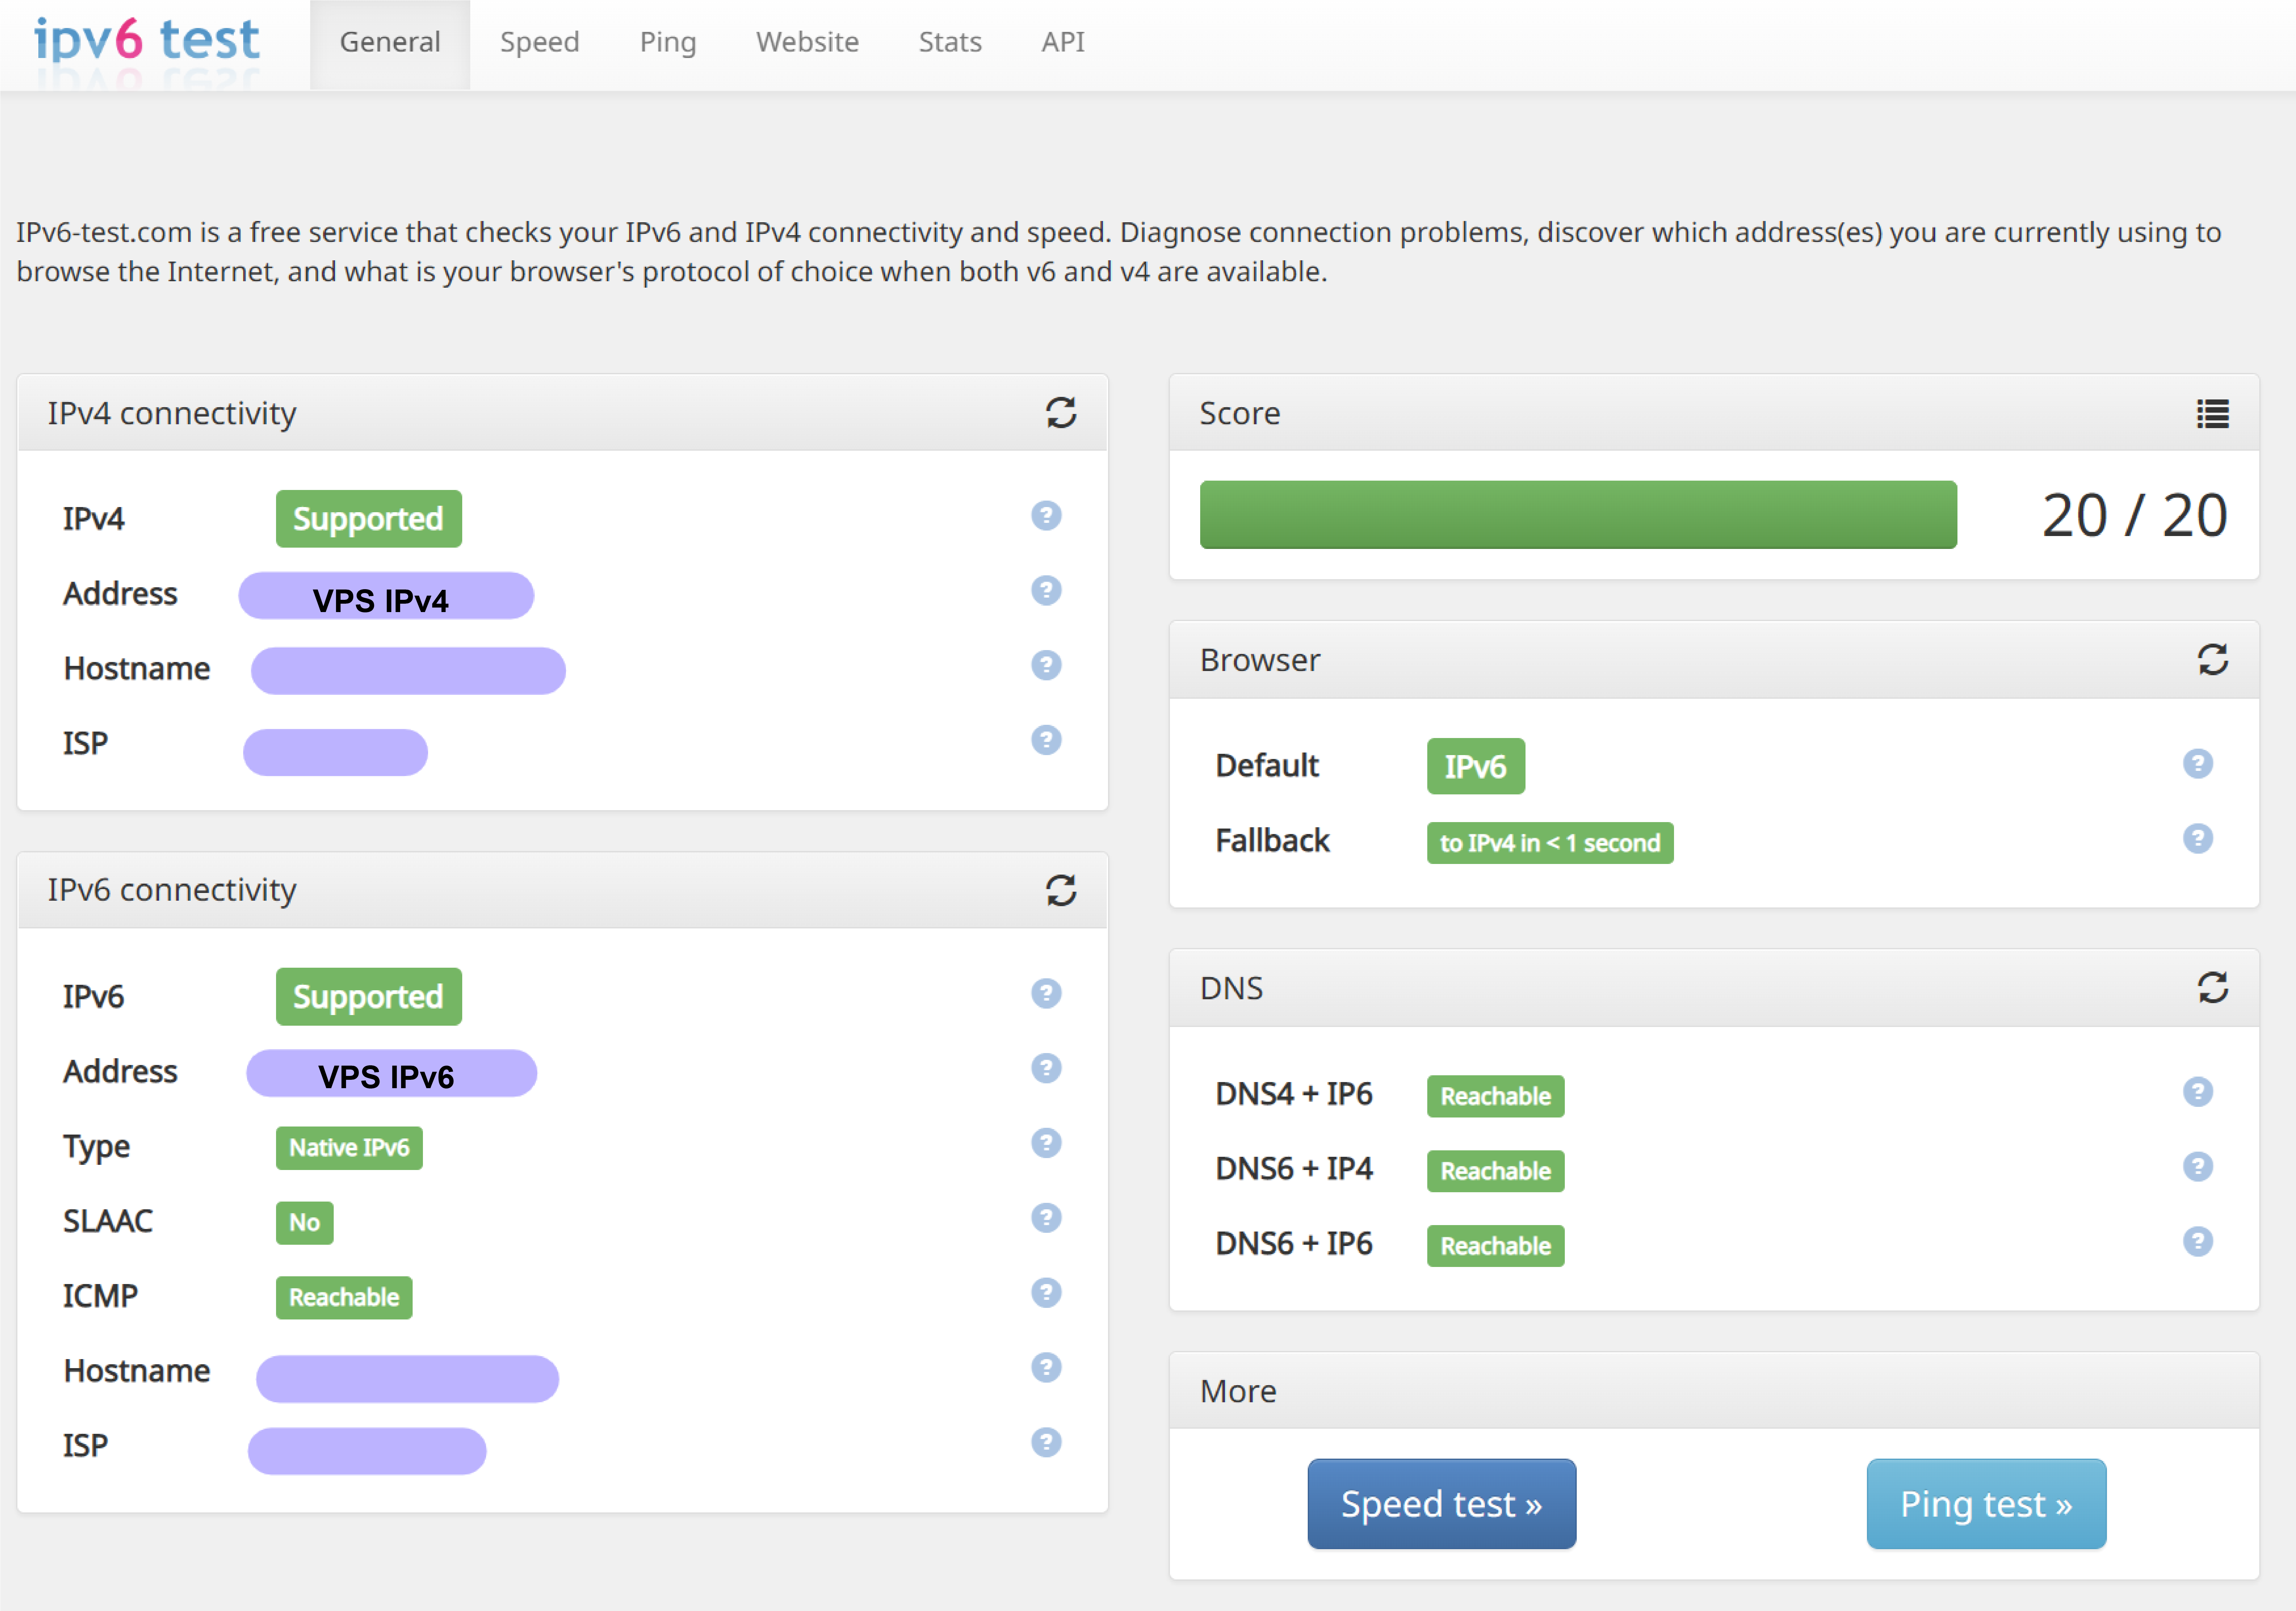
After setting up according to the above methods, the device can access via dual-stack. Entering a test website like , you can see the following results (you need to proxy this website to see the result below):
## Finally
After setting up according to the above methods, the device can access via dual-stack. Entering a test website like , you can see the following results (you need to proxy this website to see the result below):
 ## Closing Thoughts
Nowadays, IPv6 is not yet fully popularized. 99% of our daily access traffic is still IPv4 traffic. Although many VPS providers offer IPv6 addresses, the route optimization is often garbage, or even in an unusable state. So why add IPv6 settings?
It can be seen that IPv6 is currently in an awkward position. Support for IPv6 on various devices is poor, but it is gradually improving. At the same time, the priority of IPv6 in Windows systems is also increasing. Many browsers will also prioritize IPv6 resolution and access. Many websites have also started to use IPv6 for access by default (such as Netflix; if IPv6 is not configured, opening Netflix in the browser will show "Not Available" because the IPv6 request for Netflix is not proxied. Of course, you can choose to disable IPv6 in Windows, but PT sites that support IPv6 will not be usable).
In this case, IPv4 cannot fully meet the needs of web surfing. Even if it is only that 1% of traffic, encountering it can be a headache.
And it is foreseeable that IPv6 will gradually stand up to IPv4, so it is necessary to add IPv6 settings.
## Closing Thoughts
Nowadays, IPv6 is not yet fully popularized. 99% of our daily access traffic is still IPv4 traffic. Although many VPS providers offer IPv6 addresses, the route optimization is often garbage, or even in an unusable state. So why add IPv6 settings?
It can be seen that IPv6 is currently in an awkward position. Support for IPv6 on various devices is poor, but it is gradually improving. At the same time, the priority of IPv6 in Windows systems is also increasing. Many browsers will also prioritize IPv6 resolution and access. Many websites have also started to use IPv6 for access by default (such as Netflix; if IPv6 is not configured, opening Netflix in the browser will show "Not Available" because the IPv6 request for Netflix is not proxied. Of course, you can choose to disable IPv6 in Windows, but PT sites that support IPv6 will not be usable).
In this case, IPv4 cannot fully meet the needs of web surfing. Even if it is only that 1% of traffic, encountering it can be a headache.
And it is foreseeable that IPv6 will gradually stand up to IPv4, so it is necessary to add IPv6 settings.